
위로
아래
JDBC 드라이버 연결 방법
오라클
- 오라클 폴더 내에 ojbdc11.jar 파일이 있다.
- 파일을 WEB-INF > lib 폴더에 붙여넣기 한다.
- 드라이버 이름 oracle.jdbc.OracleDriver
- url에 사용할 오라클 프로토콜 : jdbc:oracle:thin:@localhost:1521:xe
MySQL
- 인터넷에서 mysql-connector-java-버전-bin.jar 파일을 받는다
- 이클립스에서 Build Path에서 라이브러리로 External JARs인 위의 파일을 불러온다.
- 드라이버 이름 : com.mysql.jdbc.Driver
- url에 사용할 MySQL 프로토콜 : jdbc:mysql://localhost/DB이름
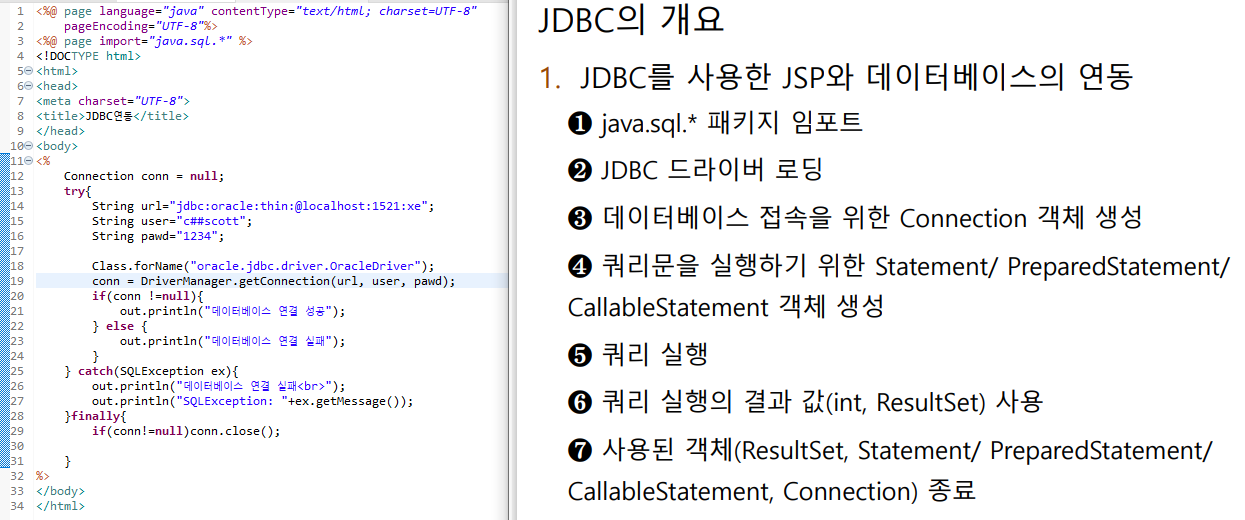
JDBC 매커니즘
- 패키지 임포트 : import java.sql.*;
- Connection, PreparedStatement, ResultSet 객체 초기화
- 데이터베이스 url, user id, user pw 문자열 생성
- JDBC 드라이버 로딩 : Class.forName("~")
- Connection 객체에 DriverManager 객체가 가지고 있는 getConnection() 메소드를 이용해, url, user id, user pw 전달해서 데이터베이스 연결
- 쿼리문 작성 : String sql = "SELECT * FROM member";
- PreparedStatement 객체에 쿼리문 입력해서 결과 저장 : pstmt = conn.prepareStatement(sql);
- 쿼리 결과 받아오기 : rs = pstmt.executeQuery();
- 객체 close
JSP 이용 방식
<%@ page language="java" contentType="text/html; charset=UTF-8"
    pageEncoding="UTF-8"%>
    <!-- 데이터베이스 처리를 위한 객체 import -->
<%@ page import="java.sql.*" %>
<!DOCTYPE html>
<html>
<head>
<meta charset="UTF-8">
<title>JDBC연동</title>
</head>
<body>
<%
// jdbc 라이브러리 웹 서버의 lib에 저장
// 데이터베이스 연결 정보를 갖고 있는 객체 선언
	Connection conn = null;
	try{
		// 데이터베이스의 연결을 위한 주소
		String url="jdbc:oracle:thin:@localhost:1521:xe";
		// 데이터베이스 사용자
		String user="c##scott";
		// 데이터베이스 사용자 암호
		String pawd="1234";

		// jdbc 라이브러리 웹 서버의 lib에 저장되어 있으므로 사용 가능
		// 데이터베이스 접속하기 위한 드라이버 갖고오기(ojdbc11.jar)
		Class.forName("oracle.jdbc.driver.OracleDriver");
		// DB 연결객체 가져오기(연결주소, 사용자, 암호 주고 가져오기)
		conn = DriverManager.getConnection(url, user, pawd);
		if(conn !=null){   // 연결 정보 있으면 연결된 것
			out.println("데이터베이스 연결 성공");
		} else {  // 연결 정보 없으면 실패
			out.println("데이터베이스 연결 실패");
		}
	} catch(SQLException ex){
		out.println("데이터베이스 연결 실패<br>");
		out.println("SQLException: "+ex.getMessage());
	}finally{
		if(conn!=null)conn.close();

	}
%>
</body>
</html>
Class 이용 방식
Connection
String url = "...";
String user = "...";
String password = "...";

Class.forName("드라이버");
Connection conn = DriverManager.getConnection(url, user, password);
...
conn.close();- DB를 연결하기 위해 사용하는 객체
- DriverManager의 getConnection() 메소드를 호출해서 생성할 수 있다.
메소드
- createStatement() : SQL문을 DB에 전달하기 위한 Statement 객체 생성
- preparedStatement(String sql) : SQL문을 DB에 전달하기 위한 preparedStatement 객체 생성
- prepareCall(String sql) : DB의 Stored Procedure을 호출하기 위해 CallableStatement 객체 생성
Connection 인터페이스
- 데이터의 원본에 대한 커넥션은 Connection 인터페이스가 구현된 클래스의 객체로 표현된다.
- 어떤 SQL 문장을 실행시키기 전에 우선 Connection 객체가 있어야 한다.
- SQL 문장을 정의하고 실행시키는 Statement 객체를 생성할 때 Connection 객체를 사용한다.
DriverManager 클래스
- JDBC 드라이버를 통하여 커넥션을 만드는 역할.
- Class.forName(드라이버 이름) : 인터페이스 드라이버를 구현하는 작업. new 연산자 없이 직접 객체를 생성한다.
- getConnection() 메소드 : Connection 인터페이스의 구현 객체를 생성
- forName 메소드는 드라이버 클래스를 찾지 못할 경우 ClassNotFoundException 예외를 발생시키므로, 반드시 예외 처리를 해야 한다.
- DriverManager 클래스의 모든 메소드는 static이기 때문에 객체 생성 없이 사용할 수 있다
PreparedStatement
Statement
try{

    Statment stmt = connection.createStatement();

} catch (SQLException ex) {
	out.println("SQLException: "+ex.getMessage());
}- SQL 구문을 실행하는 역할
- 실행될 때마다 매번 서버에서 분석된다.
- Connection 클래스의 CreateStatement() 메소드의 호출로 생성
PreparedStatement
PreparedStatement pstmt = null;

try{

	String sql = "INSERT INTO member(id, name, pw) VALUES(?,?,?)";
    pstmt = conn.preparedStatement(sql);
    pstmt.setString(1,user_id);
    pstmt.setString(2,user_name);
    pstmt.setString(3,user_pw);

} catch (SQLException ex) {
	out.println("SQLException: "+ex.getMessage());
}- 사용하는 경우
- 동일한 질의문을 특정 값만 바꾸어서 여러 번 실행해야 할 때
- 많은 데이터를 다룰 때
- 매개 변수가 여러개일 때
- 한 번 분석되고 나면 재사용이 가능하다
- 변수 이름 : pstmt
- 위치홀더 (placeholder) ? : SQL 문장에 나타나는 토큰(Token)으로, 일단 ?로 두고 나면 실제로 SQL 문장이 실행되기 전에 실제 값으로 대체된다.
PreparedStatement 메소드
// excute() 메소드
boolean r = pstmt.excute();
// true, false 반환


// excuteQuery() 메소드
ResultSet rs = pstmt.executeQuery();
while(rs.next()){
	out.print("ID = " + rs.getString(1));
    out.print("NAME = " + rs.getString(2));
}
// ID = 아이디, NAME = 이름 출력


// excuteUpdate() 메소드
Int r = pstmt.executeUpdate();
if(r>0){
	out.print("<script>alert('성공!')</script>");
} else {
	out.print("<script>alert('실패!')</script>");
}
// 성공하면 r = 1, 실패하면 r = 0 저장- execute() -> 다 쓸 수 있음
- 수행 결과를 Boolean 타입으로 반환
- 리턴값이 ResultSet일 경우에는 true, 아니면 false 반환
- executeQuery() -> SELECT문 전용
- 수행 결과를 ResultSet 객체의 값으로 반환
- SELECT 구문을 수행할 때 사용되는 함수
- ResultSet rs = null; rs.next() 이용
- executeUpdate() -> INSERT문 사용 가능
- 수행 결과를 int타입의 값으로 반환
- SELECT 구문을 제외한 다른 구문을 수행할 때 사용하는 함수
- INSERT, DELETE, UPDATE 문에서는 반영된 레코드의 건수를 반환
- CREATE, DROP 문에서는 -1을 반환
- Int r = 0; 이용
ResultSet
- PreparedStatement의 executeQuery() 메소드로 사용
- SQL문에서 SELECT문을 성공 시 결과물로 ResultSet을 반환한다.
- SQL 질의에 의하여 생성된 테이블을 담고 있다.
- 커서(Cursor)
- ResultSet 객체는 커서(Cursor)를 갖고 있는데, 이를 통해 특정 행에 대한 참조를 조작할 수 있다.
- 커서는 초기에는 첫번째 행의 직전을 가리키고 있다.
- next() 메소드 : 커서를 다음 위치로 옮기기
- previous() 메소드 : 커서를 이전 위치로 옮기기
- first() 메소드 : 커서를 첫 번째 행으로 옮기기
- last() 메소드 : 커서를 마지막 행으로 옮기기
종합 예시
더보기
<!-- MemberInputForm.jsp -->
<%@ page language="java" contentType="text/html; charset=UTF-8"
    pageEncoding="UTF-8"%>
<!DOCTYPE html>
<html>
<head>
<meta charset="UTF-8">
<script src="https://ajax.googleapis.com/ajax/libs/jquery/3.7.0/jquery.min.js"></script>
<title>회원가입</title>
<style>
* {margin: 0; padding: 0;}
table {width: 300px; border:solid 1px black; margin: 0 auto; text-align:right;}
table td input {padding: 3px; margin:10px; }


</style>
<script type="text/javascript">
  $().ready(function () {
   $("#submit1").on("click",function () {
      var id = $('input[name=id]').val();
       var pw = $('input[name=passwd]').val();
       var name = $('input[name=name]').val();
      //빈칸 없이 참이면 전송
      if(id.trim()=="" || pw.trim() =="" || name.trim()==""){
         alert("아이디, 이름, 비밀번호 입력 필수")
         return false;
      }
      //그렇지 안으면
      var form1 = $('form[name=frmInput]');
      form1.submit();
   })
});
</script>
</head>
<body>
<h4 style="text-align:center; height: 50px;">회원가입</h4>
  <form name="frmInput" method="post" action="InputProc.jsp">
      <table>
      	<tr><th><td>아이디 : <input type= "text" name="id"></td></tr>
      	<tr><th><td>이름 : <input type="text" name = "name"></td></tr>
      	<tr><th><td>비밀번호 : <input type= "password" name="passwd"></td></tr>
      	<tr><td colspan="2">
      		<input type="button" value="전송" id="submit1">
      		<input type="reset" value="초기화">
      	</td></tr>
      </table>
  </form>
</body>
</html>
<!-- InputProc.jsp -->
<%@ page language="java" contentType="text/html; charset=UTF-8"
pageEncoding="UTF-8"%>
<!-- 데이터베이스 처리를 위한 객체 import -->
<%@ page import="java.sql.*" %>
<!DOCTYPE html>
<html>
<head>
<meta charset="UTF-8">
<title>JDBC연동</title>
</head>
<body>
<%
// jdbc 라이브러리 파일을 웹 서버의 lib에 저장
Connection conn = null;
PreparedStatement pstmt = null;
//결과 테이블(select한 결과)를 받기 위한 객체 resultSet
ResultSet rs = null;
try{
// 데이터베이스의 연결을 위한 주소
String url="jdbc:oracle:thin:@localhost:1521:xe";
// 데이터베이스 사용자
String user="c##scott";
// 데이터베이스 사용자 암호
String pawd="1234";
// jdbc 라이브러리 웹 서버의 lib에 저장되어 있으므로 사용 가능
// 데이터베이스 접속하기 위한 드라이버 갖고오기(ojdbc11.jar)
// 만약 ojdbc11.jar 파일이 없으면
Class.forName("oracle.jdbc.driver.OracleDriver");
// DB 연결객체 가져오기(연결주소, 사용자, 암호 주고 가져오기)
conn = DriverManager.getConnection(url, user, pawd);
if(conn !=null){ // 연결 정보 있으면 연결된 것
out.println("데이터베이스 연결 성공");
//해당 connection을 통해서 객체 가져오기
String sql="INSERT INTO member(ID, NAME, PASSWD) VALUES(?,?,?)"; // 쿼리문
//문자열을 데이터베이스 질의어로 받아오기
String id = request.getParameter("id");
String name = request.getParameter("name");
String passwd = request.getParameter("passwd");
pstmt = conn.prepareStatement(sql);
//?는 동적으로 데이터를 매핑해주기 위해 사용하는 것으로 SET 메소드를 이용함
pstmt.setString(1, id);
pstmt.setString(2, name);
pstmt.setString(3, passwd);
int r = pstmt.executeUpdate();
// 저장이 되면 r에 1이 들어오고, 저장이 안 되면 0이 들어온다
if(r>0) {
out.print("<script>");
out.print("alert('가입 성공!')");
out.print("</script>");
}
} else { // 연결 정보 없으면 실패
out.print("<script>");
out.print("alert('가입 실패!')");
out.print("</script>");
}
out.println("<a href='Main.jsp' style='text-align:center'>홈으로...</a>");
} catch(SQLException ex){
out.println("데이터베이스 연결 실패<br>");
out.println("SQLException: "+ex.getMessage());
}finally{
if(pstmt!=null) pstmt.close();
if(conn!=null)conn.close();
}
%>
</body>
</html><!-- Main.jsp -->
<%@ page language="java" contentType="text/html; charset=UTF-8"
pageEncoding="UTF-8"%>
<!DOCTYPE html>
<html>
<head>
<meta charset="UTF-8">
<title>회원정보</title>
<style type="text/css">
* {margin: 0 auto;}
table {width: 500px;}
th {width: 150px; text-align: right;}
td {text-align: center;}
a:link {color: black; text-decoration: none;}
a:visited {color: black; text-decoration: none;}
a:hover {color: blue text-decoration: none; font-weight:bold;}
a:active {color: black; text-decoration: none;}
h3 {height: 50px; text-align:center;}
</style>
<script src="../js/jquery-3.7.0.min.js"></script>
<script type="text/javascript">
</script>
</head>
<body>
<h3>회원 관리</h3>
<table>
<tr><th><a href="MemberList.jsp">회원 목록</a></th></tr>
<tr><th><a href="MemberInputForm.jsp">회원 가입</a></th></tr>
</table>
</body>
</html><!-- MemberList.jsp -->
<%@ page language="java" contentType="text/html; charset=UTF-8"
pageEncoding="UTF-8"%>
<!-- 데이터베이스 처리를 위한 객체 import -->
<%@ page import="java.sql.*" %>
<!DOCTYPE html>
<html>
<head>
<meta charset="UTF-8">
<title>JDBC연동</title>
<style type="text/css">
* {margin: 0 auto;}
table {width: 500px;}
th {width: 150px; text-align: right;}
td {text-align: center;}
a:link {color: black; text-decoration: none;}
a:visited {color: black; text-decoration: none;}
a:hover {color: blue text-decoration: none; font-weight:bold;}
a:active {color: black; text-decoration: none;}
h3 {height: 50px; text-align:center;}
</style>
<script src="../js/jquery-3.7.0.min.js"></script>
<script type="text/javascript">
</script>
</head>
<body>
<%
// jdbc 라이브러리 파일을 웹 서버의 lib에 저장
// 데이터베이스 연결 정보를 갖고 있는 객체 선언
Connection conn = null;
//sql 쿼리를 전송하기 위한 객체 preparedStatement
PreparedStatement pstmt = null;
//결과 테이블(select한 결과)를 받기 위한 객체 resultSet
ResultSet rs = null;
try{
// 데이터베이스의 연결을 위한 주소
String url="jdbc:oracle:thin:@localhost:1521:xe";
// 데이터베이스 사용자
String user="c##scott";
// 데이터베이스 사용자 암호
String pawd="1234";
// jdbc 라이브러리 웹 서버의 lib에 저장되어 있으므로 사용 가능
// 데이터베이스 접속하기 위한 드라이버 갖고오기(ojdbc11.jar)
// 만약 ojdbc11.jar 파일이 없으면
Class.forName("oracle.jdbc.driver.OracleDriver");
// DB 연결객체 가져오기(연결주소, 사용자, 암호 주고 가져오기)
conn = DriverManager.getConnection(url, user, pawd);
if(conn !=null){ // 연결 정보 있으면 연결된 것
out.println("데이터베이스 연결 성공");
//해당 connection을 통해서 객체 가져오기
String sql="SELECT * FROM member"; // 쿼리문
//문자열을 데이터베이스 질의어로 받아오기
pstmt = conn.prepareStatement(sql);
//pstmt메소드 : execyteQuery() -> select문 전용
//executeUpdate() -> 인서트 전용
//execute() -> 다 쓸 수 있음
rs = pstmt.executeQuery();
// rs에 받아온 데이터가 있으면 출력
while(rs.next()){ // 해시 테이블로 되어 있어서 한 번 읽으면 끝 (다시 읽으면 다음 줄 읽음)
//데이터를 필드명으로 가져오기
String id = rs.getString("id");
String name = rs.getString("name");
String passwd = rs.getString("passwd");
out.print(id + "\t" + name + "\t" + passwd);
out.print(id+":::::"+name+":::::"+passwd+"<br>");
}
//rs에 받아온 데이터가 있으면 출력
} else { // 연결 정보 없으면 실패
out.println("데이터베이스 연결 실패");
}
} catch(SQLException ex){
out.println("데이터베이스 연결 실패<br>");
out.println("SQLException: "+ex.getMessage());
}finally{
if(rs!=null) rs.close();
if(pstmt!=null) pstmt.close();
if(conn!=null)conn.close();
}
out.println("<a href='Main.jsp' style='text-align:center'>홈으로...</a>");
%>
</body>
</html>